
Overview
Districts that offer family-paid programming can provide scholarships to eligible students. This guide explains how to manually set up scholarship eligibility in 6crickets when:
- Student eligibility data is not stored in your district's Student Information System (SIS) or
- Your district is not using 6crickets' restricted portal feature
Before You Begin
- You'll need access to your school dashboard at 6crickets.com/school-admin
- Scholarship discount codes are for internal use only—do not share them with families
- If you manage multiple school dashboards, you'll need to repeat this process for each one
- This process can be used alongside SIS Scholarship Sync, if needed
How to manually import scholarship eligibility
Step 1: Create Discount Codes
1. Log in to a school dashboard at 6crickets.com/school-admin.
2. Navigate to Manage registration and attendance > Add discount codes.
3. Click “+ Add a Discount Code” and complete all required fields.
4. Click “Save”
Repeat this process for each type of scholarship your district offers
Example: If you offer both full scholarships and 50% scholarships, create separate discount codes for each.
Step 2: Set Up the Scholarship Custom Question
1. From the School Dashboard, go to Manage registration and attendance > Customize registration form.
2. Locate the Scholarship Question and click the pencil icon to edit.
3. Add eligible students and codes
- Option A: Manual Entry
- Enter each eligible student's District ID (or unique identifier)
- Add a comma, then the corresponding discount code
- Format: StudentID,DiscountCode
- Example: 12345,FULLSCHOLAR or 67890,HALFSCHOLAR
- Option B: CSV Upload
-
Prepare a CSV file with two columns (no headers):
- Column 1: Student IDs
- Column 2: Discount Codes
- Upload the file using the CSV upload option
Important CSV Upload Notes:
- One student, one discount code: Each student can only be associated with one discount code—no discount code stacking
- Multiple codes in one file: Different students can have different discount codes within the same CSV file
- File replacement: Each new CSV upload completely replaces the previous import—you cannot upload multiple CSV files to add to existing data
- Single file only: You can only maintain one active CSV file at a time for each school
4. Toggle Active to the on position and click Save.
Step 3: Repeat for Multiple Dashboards (If Applicable)
If your district manages multiple school dashboards:
- Complete Steps 1 and 2 for each dashboard
- Ensure consistency in discount codes across all dashboards
Cross-School Sessions: Important Limitation
Important: If students will attend sessions hosted at schools other than their home school, you must add their scholarship eligibility to the hosting school's dashboard, as well as their home school's dashboard.
Example Scenario:
- Cricket USD's summer camp takes place at Ladybug Lane Elementary
- Sam Bee is a student at Lotus Elementary and qualifies for scholarships
- Sam Bee's student ID must be entered in the scholarship question at Ladybug Lane Elementary dashboard (the hosting school), as well as the Lotus Elementary dashboard (his home school)
Action Required:
- Identify any cross-school sessions in your district
- Add eligible student IDs to the scholarship question at each hosting school's dashboard
- Consider this when planning multi-school programs or shared facilities
How Scholarships Work Together
Using Both SIS Sync and Manual Setup
You can use both the SIS Scholarship Sync and manual setup simultaneously. This is useful when you have:
- SIS-based scholarships (e.g., full scholarships for unduplicated students)
- Manual scholarships (e.g., 50% scholarships for YMCA members)
Priority Rules:
- If a student is eligible for both types of scholarships and the parent answers the custom question, the manual scholarship takes precedence.
- If the custom question is left blank, any eligible SIS-based scholarship will be applied automatically.
For more information about SIS Scholarship Sync, refer to the dedicated help article.
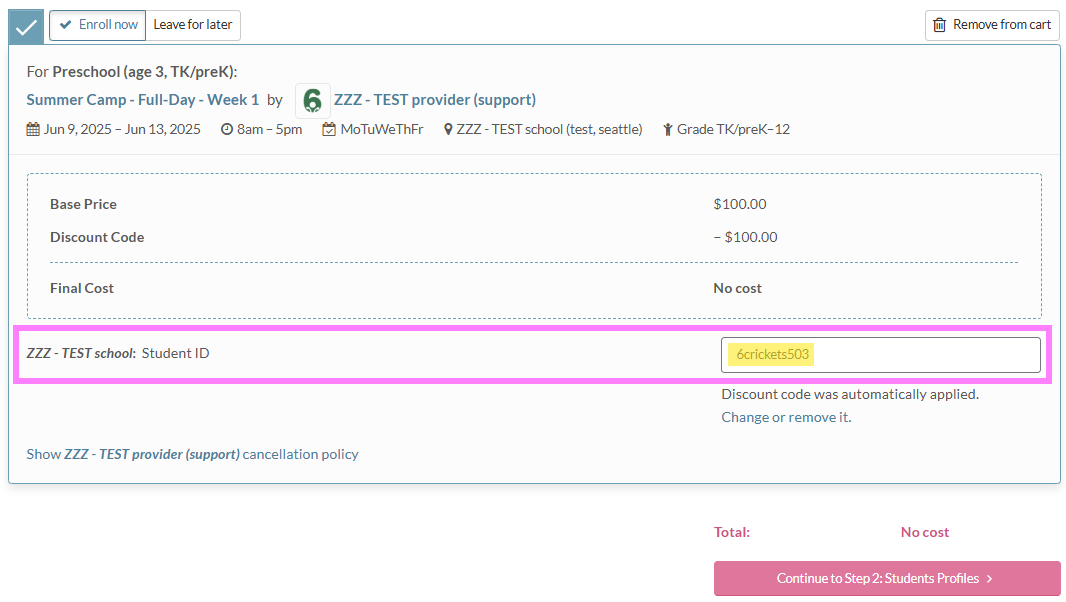
Family Experience
When families register for programs:
1. During checkout, they'll see the Scholarship Custom Question
2. If they provide a matching Student ID, the appropriate discount is automatically applied
3. If they leave it blank and SIS Scholarship Sync is active, any eligible SIS-based scholarship will be applied instead
4. The discount appears before they complete their payment
 Troubleshooting
Common Issues
- Student ID doesn't work: Verify the ID matches exactly what's in your system (check for extra spaces or characters)
- Discount not applying: Ensure the discount code is active and correctly paired with the student ID
- Multiple dashboards: Remember to set up scholarships on each dashboard separately
- Cross-school sessions: Verify that scholarship eligibility is set up at the hosting school's dashboard, as well as the student's home school
Need Help?
- Contact support if issues persist
Comments
0 comments
Please sign in to leave a comment.